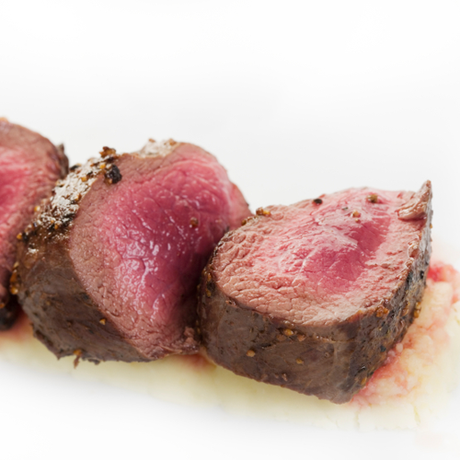
Butcher Dan's Recipe Vault

Grilled Nectarines with Honey & Cream

Grilled Nectarines with Honey & Cream

Fruit on the BBQ? Yes. 

If you needed to be told that you can char-grill fruit and don’t want to put on a couple of ounces, don’t try this, simple, but extravagant, self-indulgent, high in fat and definitely not one of your 5-a-Day, but absolutely delicious!

  • Serving Size 4

    Ingredients 

    • Nectarines halved & stoned x 4
    • 20ml honey – runny
    • 10ml black treacle
    • 5g ground cinnamon
    • 50gl vanilla ice cream
    • 20g clotted cream

    Method 

    1. Mix honey & black treacle and brush over cut surface of nectarines
    2. Grill cut-face down on medium grill for 5 minutes, or until warmed through.
    3. Serve with scoop of ice cream and smaller scoop of cream on top.
    Read more
    Chilli & Pineapple Spare Ribs

    Chilli & Pineapple Spare Ribs

    Forget the local Chinese this summer (plenty of time for that in the winter); this Asian Delight is a real grill-star of the Orient and I got the idea for this dish at, believe it or not a pub on Lantau Island. Simple to both prepare and BBQ, these ribs taste great being, sweet, sour and spicy all at the same time!

    • Serving Size 2

      Ingredients 

      • Pork spare ribs x 6
      • Small canned pineapple, finely chopped, plus juice
      • Birds Eye chillies – finely chopped/deseeded
      • Red onion – finely chopped
      • 4 crushed garlic cloves & 30g grated ginger
      • 50ml x tomato puree
      • 50ml lime juice
      • 50ml runny honey
      • Olive oil + sea salt, black pepper

      Method

      1. Separate ribs and simmer in salted water for 30 mins – drain & cool
      2. Pan-fry garlic, ginger, onion & chillies with oil until soft then add in chopped pineapple. Add pineapple juice, tomato puree & honey. Season to taste and boil till thick – leave to cool.
      3. Brush mixture over ribs and grill over medium heat for around 15 mins, or until sauce becomes crusty/brown.


      Read more
      Coriander & Ginger Lamb Chops

      Coriander & Ginger Lamb Chops

      Lamb works really well on the Barbi and new season best of all. This recipe is a variation on a dish picked up at a small roadhouse on the way out of Bondi, the slightly fusion edge enhances the overall flavour. 

      • Serving Size: 2

        Ingredients 

        • 6 Best-end lamb chops (bone in)
        • 50g ginger, grated
        • 1 ripe papaya, peeled and rough chopped
        • 30g bunch of fresh coriander, finely chopped
        • 50ml extra virgin olive oil
        • 2 or 3 hot green chillies, finely chopped and deseeded
        • 100ml thick plain yoghurt
        • 30g unsalted butter

        Method 

        1) Mix ginger, papaya, oil and coriander in liquidiser, mix in the chillies and yoghurt

        2) Remove fat/meat from top 2 inches of chop and flatten out meat, removing any extra fat - we can do this for you, just ask 

        3) Coat the chops with marinade and refrigerate in sealed bag for at least 4 hours

        4) Sear on high heat, then grill for around 10 mins on medium heat and then a further 5 minutes on low. Keep turning to prevent burning and baste with melted butter.

        5) Season with salt & pepper and leave to rest for a few minutes before serving.


        Butcher Dan's Tip: Serve in an upright triangle, bones to the sky!

        Read more
        Charcoal vs Gas BBQ

        Charcoal vs Gas BBQ

        Although there are almost as many different types of BBQ grill as there are days in the year, perhaps the most fundamental question in buying a BBQ is whether to go for charcoal or gas. Today this choice is both easier and more complicated than it was even five years ago, when the choice of grills was quite limited and the market was dominated by charcoal, with gas grills mainly being quite expensive. Now there’s probably more gas grills around than charcoal and the cost has come down dramatically.

        So, to gas or not to gas what’s the answer, well simply there isn’t an easy one. Originally most people entered the market by way of a simple charcoal grill, but now with gas grills costing under £50, this has all changed, so is it gas or charcoal, or even both?


        Charcoal Grills

        BBQ purists would argue that you can only really get that true BBQ taste from charcoal as charcoal adds flavour and depth to food, whereas gas simply cooks. Certainly, charcoal imparts a smoky style, which can be enhanced by the addition of wet wood chips or herb branches.

        However, whilst charcoal adds flavour, for some lighting charcoal can be a tricky business. For even expert grillers there remains the set-up time; and you can also control the heat by varying the depth of charcoal across the grill from thin/low to thick/hot. The addition of a natural charcoal lighter, such as coconut gels also helps, and you can now even get coconut charcoal.


        Gas Grills

        On the other hand, modern gas grills are now so much easier and user-friendly and are perfect for both impromptu, or ‘after-work Barbi’s as well as for more sophisticated alfresco eating and outdoor dinner parties. They also get up to cooking speed quicker and are so much more controllable, especially the multi-burner grills, or those with a hood or smoker attachment.

        Many gas grills now come with a rotisserie, hobs, griddle plates, or woks, as well and warming plates. Certainly, unless you’re only going to BBQ very occasionally, it pays to have a hooded, multi-burner grill, with a minimum of 3 burners. Gas grills with lava-rock beds are perfect as you can even get a charcoal smoke effect by throwing wet on wood chips or herb branches. Even gas canisters have changed with either lightweight see through styles or those with gauges to ensure you don’t run out of gas.

        SO, WHAT’S THE ANSWER?

        Well the easiest way to choose is;

        Charcoal for Taste & Gas for Ease!

        Read more
        Better for you BBQ advice

        Better for you BBQ advice

        We are here to help you become true BBQ legends with help and advice from our expert team of grill-masters! 

        BBQ Tip 1 – Burnt is Bad!

        The days of a burnt burger in a limp bap, doused in ketchup, and served with the cry "if it ain't burnt – it ain't BBQ!" are thankfully long gone. Burned food is unhealthy; it doesn't look or taste good, and it isn't good for you! 

        BBQ Tip 2 – Pick n’Choose

        Barbi is a more relaxed and informal affair than a regular supper, and the food selection is far more diverse. Burgers & Sausages, llean meat, poultry, vegetables, and even fruit are all high on the grill stakes, so you'll probably receive a greater variety of healthier cuisine than you would indoors!

        • Mix Peppers, Onions and Halloumi Cheese for tasty Vegetable Kebabs 
        • Turnbull's Coleslaw and Potato Salad are excellent side dishes 
        • Ask our Butchers to Mix n Match Sausages for you from our range

        BBQ Tip 3 – Gas or Charcoal

        Most first time BBQ’ers buy a simple charcoal grill, but gas grills can now cost under £50. So just what’s the best? Well; gas is simpler to use and more easily controllable. Whilst charcoal is more traditional and adds that essential BBQ taste. A simple guide is ‘Gas for ease’ and ‘Charcoal for taste’.

        • Pickup a bag of 'Big K' lump wood charcoal on your next visit 

        BBQ Tip 4 – Hot Tip

        A good guide to grill temperatures is the hand test. Hold your hand around 6” from the grill; if you can only keep it there for a few seconds, the temperature is too hot, 15-30 seconds is high and an ideal searing heat. 30-60 seconds,  means a medium temperature, ideal for normal grilling. Over a minute, fairly warm and good for keeping food warm. Any longer and the grill is not ready.


        Read more
        Robson's Smoked Salmon, R. Ord Egg & Asparagus Tart

        Robson's Smoked Salmon, R. Ord Egg & Asparagus Tart

         Ingredients

        • Puff pastry 1 x 320g sheet
        • 4 x Free Range Eggs from R. Order & Sons eggs 
        • Asparagus spears 200g
        • Cream cheese 150g, softened
        • Robsons of Craster Smoked salmon (115g pack)
        • Small bunch chives finely chopped


        Method 

        STEP 1

        Preheat the oven to 220°C/200°C Fan/Gas Mark 7. Unroll the puff pastry sheet and place on its paper onto a baking tray. Using a sharp, small knife cut a 1.5cm border around the edges (making sure not to cut all the way through). Prick the inside of the pastry all over with a fork.


        STEP 2

        Place in the oven and bake for 20 minutes, until golden and puffed. Remove from the oven and, using a spoon, carefully push the inside of the pastry back down. Cool for 10 minutes.


        STEP 3

        Meanwhile, bring a medium pan of water to the boil and add the eggs. Boil for 7 minutes then lift out and run under cold water to cool. Peel and cut into quarters.


        STEP 4

        Add the asparagus to the boiling water along with a generous pinch of salt and cook for 5-7 minutes until soft, but still with a little bite. Drain under cold water to cool and set aside.


        STEP 5

        Spread the inside of the pastry with the cream cheese. Top with the asparagus spears, smoked salmon and quartered eggs. Season lightly with salt and pepper and sprinkle over the chives. Cut into 15 squares to serve.  

        Recipe courtesy of British Lion eggs.


        Read more
        Honey Mustard Roast Gammon

        Honey Mustard Roast Gammon

        Add a sticky honey and mustard glaze to gammon for a delicious sweetness that contrasts with the saltiness of the meat. It's great for a celebration supper. 

        Ingredients

        • 2½ kg boneless unsmoked gammon joint (save 10% throughout May) 
        • 1 sprig thyme, 2 bay leaves ,and 1 rosemary sprig tied together
        • 1 onion, halved
        • 2 carrots, roughly chopped
        • 1 celery stick, roughly chopped
        • 1 tbsp black peppercorns
        • 1 tsp cloves

        For the glaze

        • 1½ tbsp English mustard
        • 70g clear honey
        • 2 tbsp soft dark brown sugar


        Method

        • STEP 1

          Put the gammon in a large, deep saucepan. Add the tied herbs, onion, carrots, celery, peppercorns and cloves. Pour over enough cold water to cover the meat, then bring to the boil, cover with a lid, and lower to a gentle simmer for 1 hr 15 mins. Turn off the heat and leave the ham to sit in the liquid for 30 mins.

        • STEP 2

          Remove from the liquid (this makes a delicious soup stock) and leave to cool until cold enough to handle. Peel off the thick layer of skin on the gammon to reveal a layer of fat. Discard the skin and score the fat in a criss-cross pattern with a sharp knife.

        • STEP 3

          Heat the oven to 200C/180C fan/gas 6. Put the ham in a roasting tray lined with foil. Mix together the mustard, honey and sugar in a bowl, then generously brush half over the ham. Roast for 15 mins, then brush with the remaining glaze. Return to the oven for a further 20-30 mins or until sticky and brown. Leave to cool for 15 mins before carving into thick slices.

        Read more
        Orange and thyme roasted turkey crown

        Orange and thyme roasted turkey crown

        Turkey is not just for Christmas! Enjoy this succulent alternative to Beef or Lamb with bursting with spring flavour! 

        Ingredients

        • Medium boneless turkey crown
        • zest and juice of 1 orange
        • 15 g fresh thyme, leaves picked and washed
        • 1 large clove garlic, crushed
        • 2 tbsp olive oil

        Method

        1. Preheat the oven to 200°C, fan 180°C, gas 6. Put the orange zest, thyme leaves, garlic and olive oil in a pestle and mortar and crush together to make a marinade – or use a bowl and the end of a rolling pin.
        2. Rub the marinade all over the turkey and put the crown in a roasting tin. Season with black pepper and cover loosely with foil.
        3. Cook in the oven for 20 minutes per kg, plus 70 mins, removing the foil after 1 hour and drizzling over the orange juice. To test if the turkey is cooked, pierce the thickest part with a skewer. The juices should run clear. If not, continue to cook.
        4. When done, remove the turkey from the oven, cover with foil and rest for 15-20 minutes before carving


        Read more
        Rosé Roast Chicken

        Rosé Roast Chicken

        Don't limit yourself to only drinking rosé, you can cook with it too!   To make the flesh more flavourful and luscious, add a glass to your usual roast chicken recipe. 

        Ingredients

        • A whole British Roasting Chicken 
        • 10 thyme sprigs
        • 3 garlic cloves, crushed
        • 2 tbsp white balsamic vinegar
        • 100ml Rose Wine (try Waverider Sauvignon Blanc Rose) 
        • 1 tbsp olive oil
        • 1 orange, sliced
        • 1 lemon, sliced
        • 1 onion, cut into wedges
        • 500g Chantenay Carrots
        • 480g frozen Petits Pois

        Method

        1. Preheat the oven to 220C, 200C fan, gas mark 6. Strip half the thyme leaves from the stalks, add the leaves to a small bowl along with the garlic, balsamic, rose wine, olive oil and seasoning. Whisk with a fork to combine. 
        2. Place the chicken in a high-sided roasting dish. Push half the orange and lemon slices into the chicken cavity, along with the remaining whole thyme sprigs. Place the remaining orange and lemon slices and onion wedges around the chicken in the roasting dish. 
        3. Pour the marinade over the whole chicken. Turn the chicken on its side, sitting on one leg propped up with the fruit if necessary. This helps cook the bird more evenly and ensures juicy chicken breasts. Roast for 20 minutes. Carefully turn the chicken over onto its other side, sitting on the other leg. Baste with the juices, and return to the oven for another 20 minutes. Finally, turn the chicken on its back, breast side down, baste once more and roast for a final 20 minutes. Remove from the oven, baste in the juices and let rest for 20 minutes under a foil tent. 
        4. While the chicken is resting, bring a saucepan of water to the boil, then cook the carrots for 8-10 minutes or until just tender. Add the peas for the final 2 minutes. 
        5. 5Serve the rosé roast chicken on a platter with the roasted orange, lemon, and onion, with the vegetables on the side.
        Read more
        Easy Garlic Roasted Lamb

        Easy Garlic Roasted Lamb

        Roasting a lamb shoulder is as simple as roasting a chicken, if not simpler. All you need to do is rub your roast with a mixture of fresh herbs, garlic, and olive oil before placing it in the oven for around an hour. If you roast the meat on top of a bed of potatoes, you'll get all that flavour from the Lamb captured into the spuds! 

        INGREDIENTS

        • 1.2kg Half Lamb Shoulder on the bone from our Easter Collection 
        • cloves garlic, minced
        • 1 tbsp. freshly chopped rosemary
        • 2 tsp. fresh thyme leaves
        • 3 tbsp. extra-virgin olive oil, divided
        • Kosher salt
        • Freshly ground black pepper
        • 2 lb. Baby potatoes, halved if large

        DIRECTIONS

        1. Preheat oven to 170c / Gas Mark 3/4 and place oven rack in lower third of oven. In a small bowl, mix together garlic, rosemary, thyme, and 1 tablespoon oil and season generously with salt and pepper. Rub all over lamb.
        2. In a large baking dish, toss potatoes with remaining oil and season with more salt and pepper.
        3. Place lamb on in tray roast for 3 hours until tender.
        4. 1 hour before the Lamb is ready, take the Lamb out and pop the potatoes underneath in the tray. Sit the Lamb back on top and continue to roast. 
        5. Let rest 15 minutes, then slice roast and serve.
        image by: ETHAN CALABRESE


        Read more
        Honey & Orange Glazed Duck Breasts

        Honey & Orange Glazed Duck Breasts

        The sweetness of the orange and honey pairs really well with the duck breasts.

        INGREDIENTS

        2 Duck Breasts
        2 Large Oranges
        10 New potatoes, boiled in salted water and then cut in half
        2 Cloves garlic, thinly sliced
        Leaves from 1 bunch of thyme
        120g Honey
         

        METHOD

        1. Pre heat oven to 180°C, Fan 160°C, Gas Mark 4
        2. Score the skin of the duck breasts and pat dry.
        3. Peel and segment one of the oranges and zest the other orange and squeeze the juice out. Set both aside.
        4. Place a pan onto a low to medium heat, season the duck with salt and place into the pan with no oil and cook for 6-8 minutes or until the skin is crisp and golden. Pour off any excess fat as you cook. Flip the breast over and seal the meat for 30 seconds.
        5. Place in a baking tray skin side up and place in the oven for 4 minutes.
        6. Meanwhile place the pan back onto heat and add in the honey, orange juice and zest, garlic and half the thyme. Reduce the sauce by half. Add in the potatoes and the orange segments and continue to simmer until loosely sticky. Set aside.
        7. Meanwhile remove the duck from the oven and glaze the skin generously with some of the pan mixture. Return to the oven for a 2-3 minutes if you like it rare (cook for a few minutes if you prefer it medium to well done), take out and allow to rest for at least 5 minutes.
        8. When you are ready to eat, bring the pan up to heat, divide the sauce and potatoes onto 2 plates. Carve the duck breast into 5 or 6 pieces and place on top, sprinkle over the remaining thyme leaves. Serve with your favourite greens.


        This recipe was originally found at: https://www.gressinghamduck.co.uk/recipes/honey-and-orange-glazed-duck-breast/
        Read more
        Easy pancakes by Baker Phil

        Easy pancakes by Baker Phil

        Ingredients

        • 100g plain flour
        • 2 large eggs (use R. Ord's Free Range Eggs) 
        • 300ml milk
        • 1 tbsp sunflower or vegetable oil, plus a little extra for frying
        • lemon wedges to serve (optional)
        • caster sugar to serve (optional)

        Method

        • STEP 1

          Put 100g plain flour, 2 large eggs, 300ml milk, 1 tbsp sunflower or vegetable oil and a pinch of salt into a bowl or large jug, then whisk to a smooth batter.

        • STEP 2

          Set aside for 30 mins to rest if you have time, or start cooking straight away.

        • STEP 3

          Set a medium frying pan or crêpe panover a medium heat and carefully wipe it with some oiled kitchen paper.

        • STEP 4

          When hot, cook your pancakes for 1 min on each side until golden, keeping them warm in a low oven as you go.

        • STEP 5

          Serve with lemon wedges and caster sugar, or your favourite filling.

          Baker Phil's Tip

          Once cold, you can layer the pancakes between baking parchment, then wrap in cling film and freeze for up to 2 months! 

        Read more
        58 results